|
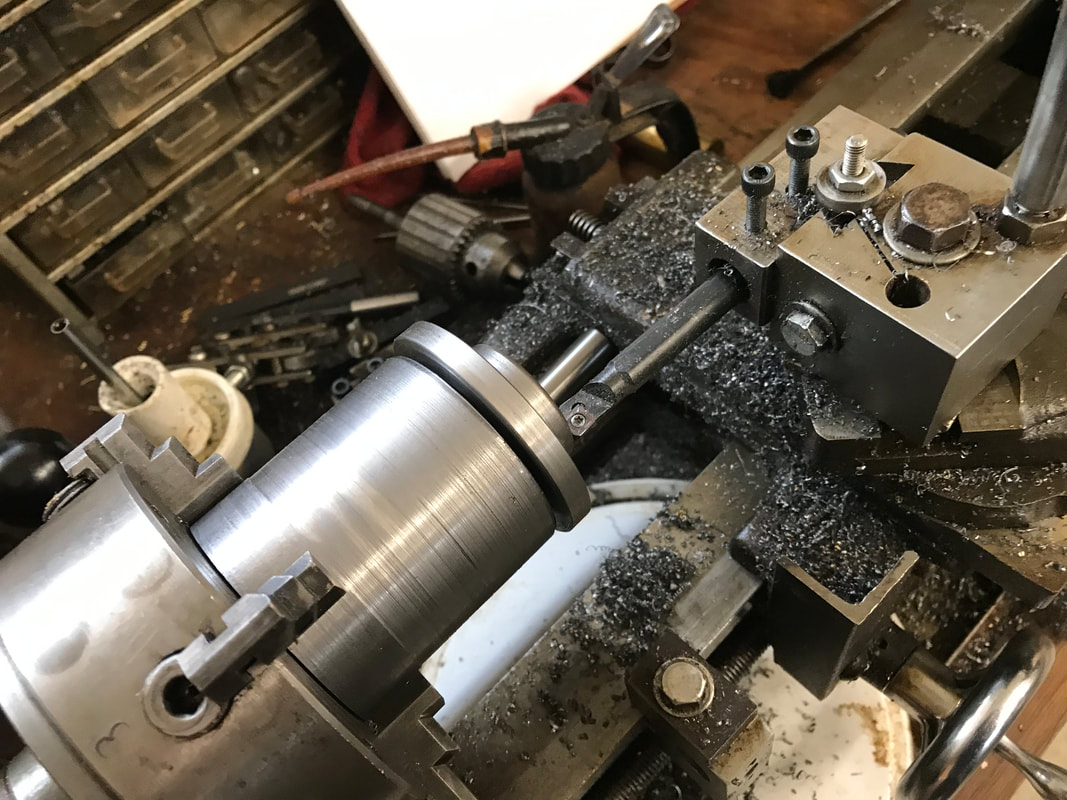
Hello Electrified Miata Fans! Last week, the goals were: 1. fitting metal between the Leaf motor and Miata transmission 2. test if motor/inverter works without main power 3. finish one mid-sized Miata battery 4. debug the newly updated BMS test fixture and produce more BMS boards. Please join us as we experience the ups and downs on this journey to make an Electrified Miata! To facilitate the joining of the Leaf motor and Miata transmission, I needed to locate some metric nuts and bolts. I thought that Nissan Leaf and Mazda Miata hardware would be nearly the same. They are both Metric and made in Japan. However, Miata bolts use a finer thread while the Nissan bolts tend to use a coarser thread. Grrr! Home Depot and Lowes still don't have a large selection of metric hardware, although it is getting better. I found 1/2 of the needed Leaf bolts right away at Home Depot, but they didn't have the right size nuts for the Miata transmission bolts. I thought, no problem, I'll go to Austin Bolt Company later in the week. From experience, I know they have ALL the nuts and bolts. I was really surprised when I went to the Austin Bolt Company and was told they no longer do any over the counter business. Darn it! Ordering online, I'll have to figure out exactly what I need or buy enough sizes that something will fit! Dissappointed about the change in Austin Bolt Company, I stopped by Lowes on the way home and got a few more of the nuts and bolts, at least enough for car night. Nuts and bolts out of the way, what's next? Does this motor even work? I have three Leaf motors and after I got the first one running haven't bother to test motor #2 and motor #3. One problem at a time! I'll need to bring some equipment to Ed's shop to see if motor #2 seems like it will work. I brought one Pi with CAN communication over to Ed's workshop and plugged everything in. The Graphical interface program wouldn't connect to my system! Yikes! A software problem for me to solve. Finally a problem I wouldn't have to wait for parts to arrive! A bit of debugging showed me that not being connected to my home network was the problem. A few code changes and I was ready to try it again. This time we had success. While I'm not 100 percent sure the motor will run with power, everything that is required appears to be working correctly. The inverter CAN communication is verified by reporting both the motor and inverter temperatures. The inverter faults after 10 seconds from not having a minimum of 240 volts. However, it still reports when the motor is rotated in either direction. Best of all, the main power bus starts to charge when the motor is turned, indicating proper inverter operation. I was almost able to reach 5 volts rotating the motor by hand! lol Now that the motor was verified, it was time to turn my attention to getting enough DC power to run the motor. One of the goals last week was to finish a mid-size battery pack. Having this pack give me 5 portable packs combined so we can run the motor. It will also allow us to test the new revision of BMS boards. We'd love to verify that the signal degradation problem has been solved. The mid-sized pack will allow us to test 20 boards in a string versus the 12 boards in a small pack! I got the battery pack on the bench and proceeded to attach the two bus bars. Then I noticed that the wires seem too close for installing washers. The mounting studs are not supposed to touch the battery wires in any way. I found some plastic washers online but they won't be here till next week. I set finishing that pack aside for now and will pick it up again when the plastic washers arrive. With some time freed up, I decided to see if the BMS revision I have would work with 12 boards in string vesus the 2 strings of 6. I like as few wires as possible in the system and one string of 12 would allow me to remove 2 wires (a receive and transmit) from the system. I connected both strings of 6 in series and only 7 of the 12 boards reported. What the heck? I'll do some debugging and call Joe if I can't figure it out! Joe was working away and got the newest test fixture up and running. However, he didn't have all the parts he needed. Then we found out the parts he installs , the processor, and connectors were on back order! Yikes. This could create a major road block to the project. Our supply chain is critical. Joe got creative and scavenged a bunch of processors and connectors from previous generation boards. Lucky for us, Joe received notice that his order shipped, creating only a minor delay for us. Car night arrived complete with adult beverages at Ed's shop! Thank you Ed and Irene! Brian and Bruce worked on the interface to the Leaf motor. The plan is to get the steel interface to the Leaf finished first, complete with alignment dowels. They started with the hardest part first.  This interface part is challengine because the holes are blind holes and the piece needs to be on a slight angle to catch all the holes. They first painted the holes and used a piece of Masonite to transfer the pattern. After a few adjustments, they transferred this pattern to steel. I thought this was pretty clever and feel blessed to work with so many talented individuals. Since the holes are not through holes, additional holes are requited to get at the bolt head with a socket. Drilling a 1" hole in 1/4" steel isn't trivial. We used Ed's mill to do this job. The drill bit got stuck in the metal piece quite a few times as the drill bit would grab. Thanks Bruce and Brian for both your cleverness and persistence in getting this first piece ready to test fit.  Ed and I worked on the larger coupler, which will couple the leaf motor coupler and the Miata clutch spline. I wanted to play with the lathe a little bit since my grandfather had the same lathe down in his basement and I was too young to operate it. Using a lathe requires at least three of our senses. Visually, you are watching how the metal is cutting, and watching to see if that tiny screw that holds the cutter is loosening. We spent a fair amount of time looking for that darned screw and lost at least one. The screw is small enough that it is easily stripped so we have to be very careful about over-tightening. Lots of vibration results in an easily loosened screw.. Sigh.  You are also listening carefully. The sound of metal cutting smoothly is much different than when the metal is not cutting smoothly. The difference is not only heard, but felt as this lathe requires a manual touch. Too aggressive and the lathe either stalls or screeches badly. Too little pressure and the cutter is scraping rather than cutting. A delicate balance, but it was fun to experience. Operating the lathe felt similar to driving a car, sensing all the inputs of sound and touch, making minute adjustments to control the car on changing road conditions. Of course, just like a car, I got overly aggressive and cut the coupling hole a little too wide. Luckily for me, the hole wasn't deep enough, so I didn't ruin the coupler. Whew.
Next week, depending on parts, we will make more BMS boards, finish up the
mid-sized Miata pack and make more progress joining the Leaf motor and Miata transmission. Hope everyone is having fun and staying healthy. Thanks for reading.
0 Comments
Leave a Reply. |
AuthorBill likes cars that understand the 'go fast now' pedal. Archives
May 2022
Categories |
 RSS Feed